
Check the method, man. [Image courtesy of Heavy Rotation, LLC Booking Agency]
Part 2: Methods
In continuation of this multi-part series explaining the crucial exposure ramp (over/under) camera test, I must explain the methods behind my madness. What’s the big deal with devoting a complete article to a seemingly self-explanatory procedure of bracketing exposures? Well, ask any two cinematographers on how they do the test, and you will find a wide variety of responses that complicate the affair.
As I previously stated, cinematographers take many routes in this type of test. One can take the strictly technical route by photographing a single, isolated chart bathed with a pure illuminant at a consistent color temperature. Or, one can take a purely subjective route by bracketing exposures of multiple types of scenes with a small gray card sitting in the key exposure.
More often than not, I have found that cinematographers performing this test pick some form of the more purely subjective route, and for obvious reasons—they want to focus on their particular project’s demands with a more concrete and relevant set of data and don’t have the time to completely explore a camera’s detailed color response. However, this subjective nature often does not provide enough information to fully understand how a camera or film stock responds to the full range of light and leaves one unprepared for multiple situations.
The following methodology I have adopted for myself synthesizes both approaches by containing a range of tonal values contained within a typical scene and flatly lit for accurately even chart exposures. It does not provide perfectly exhaustive technical results, but it does have enough technical rigor to provide consistent and more than enough technical information to the filmmaker to make intelligent production decisions with a camera. Conversely, it also does not provide purely subjective results, since few cinematographers in their right mind would light a narrative scene in this flat, dimensionless matter (unless they decided to shoot a sitcom look, or movie about cinema camera testing!).

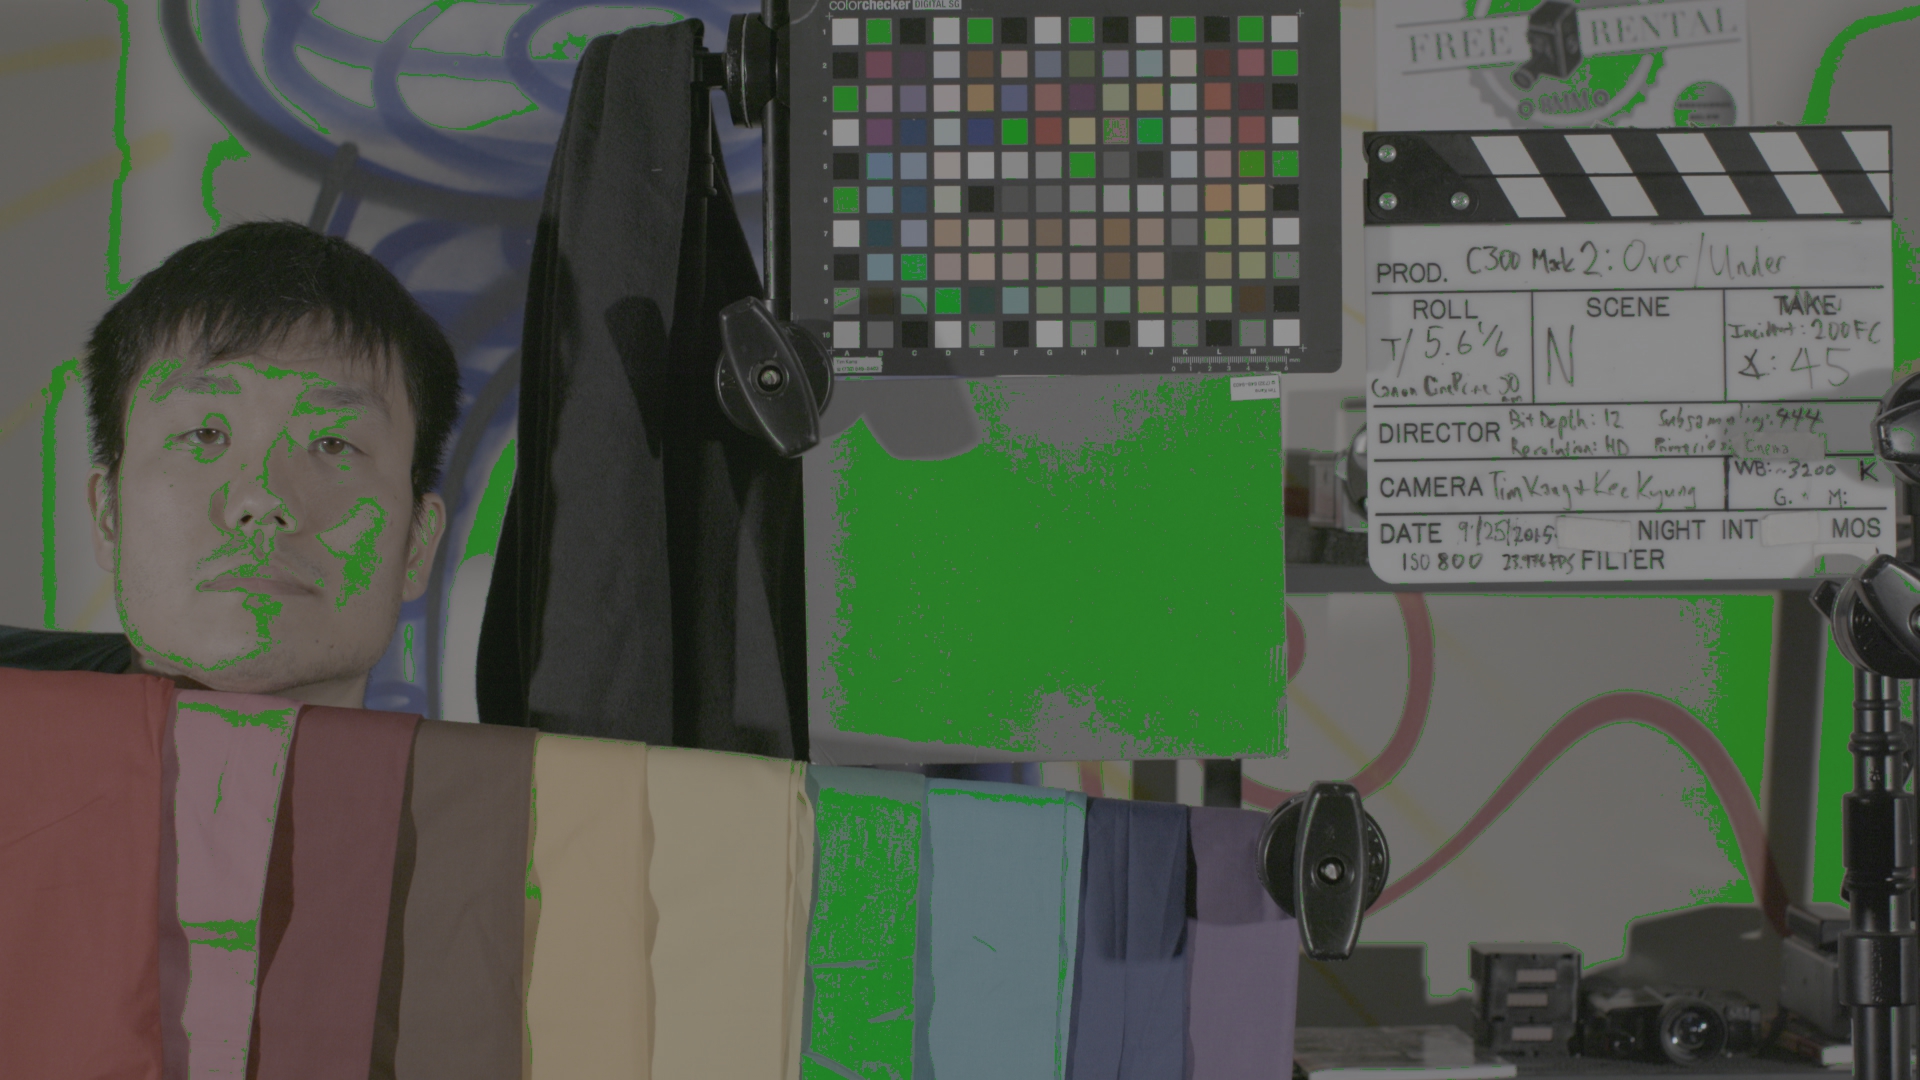
Sample trial from the test
I tend to do this hybrid when I want to maximize the little time and resources available to test a camera. If I had all the budget and time in the world, I would do a complete camera testing series with a battery of purely technical exposure ramp tests (gray card, multiple color charts, skin tones) and subjective exposure ramp tests (day interior, day exterior, night interior, nature night exterior, urban night exterior).
On to the method!
———————————————————————————————
Let’s start with a question: What variables do cinematographers have at their disposal to control a scene’s exposure, and how does it relate to this testing methodology?
- Scene reflectances
- Lighting
- Filtration
- Lens choice
- Camera exposure settings
Scene reflectances (i.e. subject matter)
Of first importance to this test is the subject matter. It must tell the complete story of the camera at each exposure from a technical & practical point of view. I try to include:
- an 18% gray card placed at the exact same height as the camera lens center and light source center, and positioned at center of frame.
-
- color chip chart (the more detailed, the better. I use the X-Rite Digital ColorChecker, since it has a full range of practical reflective color information in one chart. in this test, I couldn’t get rid of the shadow cast by the c-stand knuckle in the lower left corner; however, it only affected one unique color patch)
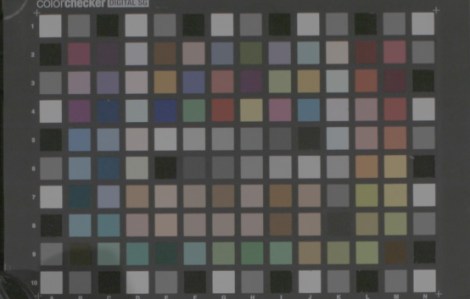
- A better chart is the transparent Image Engineering TE226 chart, but it costs more than double. Its transparency allows the possibility for more saturated colors possible than a reflective chart.
- a slate (as a white reference and for burnt in, legible metadata)
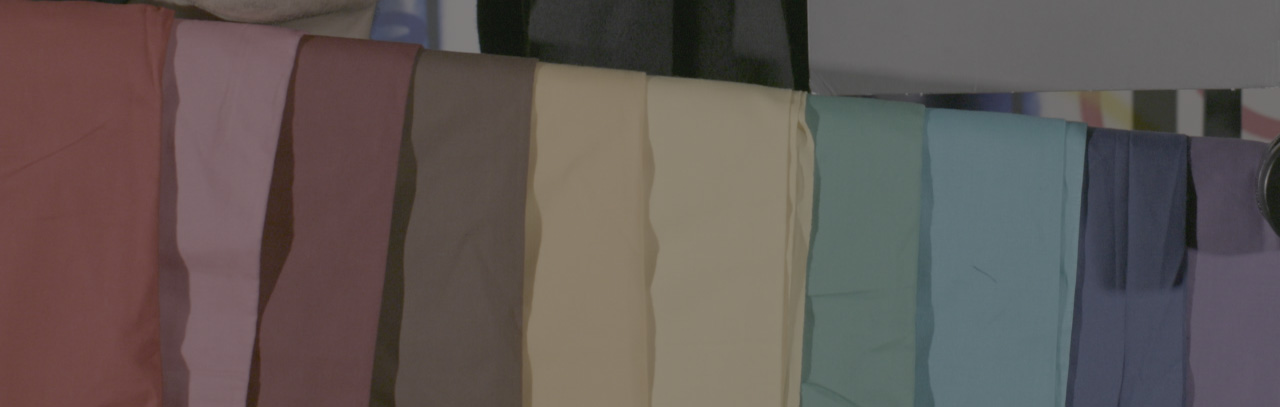
- an array of colored cloths, including a black cloth with deep black folds that approximate 0% reflectivity (this may seem redundant with the color checker chart, but the cloths provide real world examples of reflective color gradients)
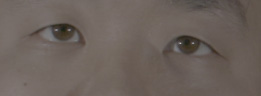
- real skin tone references (preferably 2-3 people)
- a white clip reference (I was not able to do this in this test, and not always. sometimes including this reference induces lens flare issues that mar the test results, so I tend to be quite judicious about this inclusion unless I see the white clip not induce too much flaring in the opposite corner of the frame. I often do this by hanging a white foam core card and lighting it with a bare bulb flagged off from the other scene elements and lens; I then spot meter and mark stop differences from the base white card from the regular scene lighting up to 9 stops above 18% gray)


Lighting
Generally speaking, for my method, the area surrounding the photographed scene must not contribute anything to the scene (ie, it must be a complete void). In order for me to know how the camera responds to a specific light source, I need to isolate the room from any secondary sources, lest I have no clear view of the cause and effect in this relationship.
As you can see in the actual frame and in the lighting plot below of this actual test, though, I didn’t have all of these luxuries. I had a shadow on the color chip chart, I only had myself as a model, and I didn’t include a brighter white reference. Furthermore, the room had gray carpet floor, a white ceiling, a white wall 10 feet to one side, and sunlit-window with closed blinds leaking light 20′ away. Thankfully, due to my exposure requirements, I lit the scene in a way that reduced the impact of that issues.
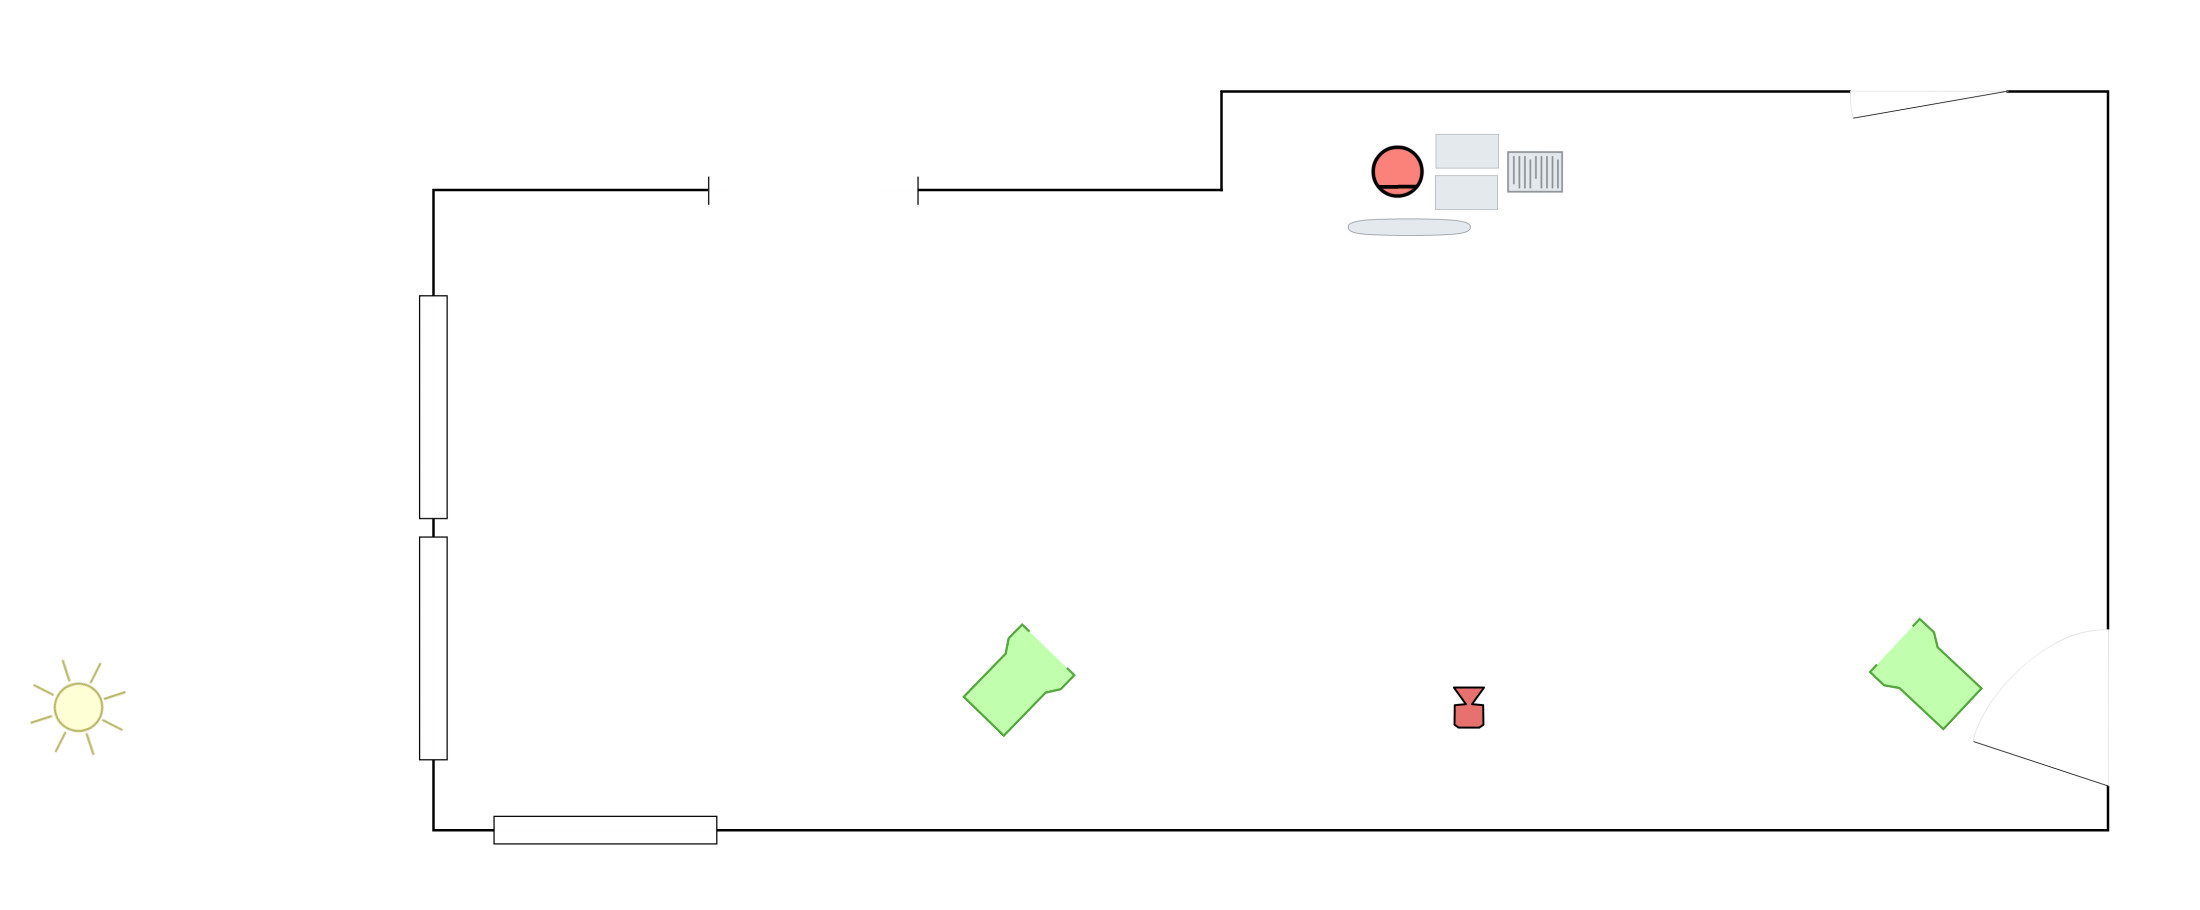
First of all, let’s discuss my lighting scheme:
For this test, I prefer two single element point sources from as far away as possible, each positioned at a 45 degree angle from the subject at the exact same height as the lens and the subject.

ARRI 1K Open Face
In this case, a generous friend donated the use of two 1K open face units that provided the correct amount of illumination for the test parameters. With a double scrim in each unit, they gave me a range of 200 foot candles (FC) incident light from 10′ (the maximum distance in that room), which would give me 400 FC at 7′, 800 FC at 5′, and 1600 FC at 5 with the removal of the double scrim. Since the stray light from the close-blinded windows metered at 5-6 FC, or about 5 stops below the lowest key light incident level, this light leak would not affect the test at any exposure setting.
45° angles to the subject plane provides good diffuse reflection and reduces direct reflection from the charts without sacrificing too much light and leaving too strong gradients on the subject from striking it at an angle.
I altered the illumination levels by scrims or by distance.
I checked the entire scene to ensure a consistent level of illumination in footcandles measurements. I prefer to use footcandles, since they serve as an absolute measurement of a physical phenomenon that my meter cannot alter with different settings.
Second of all, let’s discuss the illuminants themselves.
For this type of testing, I prefer illuminants like tungsten, skylight, and daylight, since they have complete and smooth spectra that look this:
![[Image Source: http://fixingyourvideo.com/wif-flo]](https://cineprocess.com/wp-content/uploads/2015/10/backyard-sun-spectraldistribution.png)
[Image Source: http://fixingyourvideo.com/wif-flo%5D
not illuminants like fluorescents, LEDs, and HMIs that have spectra that look like these:
![[image source: http://fixingyourvideo.com/wif-flo]](https://cineprocess.com/wp-content/uploads/2015/10/kinospectra.png "Fluorescent Spectrum")
[image source: http://fixingyourvideo.com/wif-flo%5D
![[Image Source: http://www.sangrayle.com/2008/10/selective-radiators-and-cct.html]](https://cineprocess.com/wp-content/uploads/2015/10/ledspectra.png)
![[Image Source: http://www.sangrayle.com/2008/10/selective-radiators-and-cct.html]](https://cineprocess.com/wp-content/uploads/2015/10/hmi-spectra.png)
I can explain my reasons for choosing tungsten in this test in many ways, but the most simple answer follows: the smoother (even) and complete the spectrum, the more detailed and consistent color response across the spectrum I get from the scene reflective tones. Testing with spiky spectral sources yields color responses that may bias towards specific color wavelengths (hues) and also interact with different camera sensor color filter arrays in unpredictable ways.
Within the test lighting units, I also try to ensure the cleanest reflectors and lenses, freshest bulbs, and cleanest scrims possible. All of these elements can add up to change the color temperature.
Filtration
As an overall rule, I try to not use any filtration in front of the lens to reduce any stacking effects such as internal reflections or mechanical vignetting.
IR ND Filtration
Since most ND filtration does not provide perfectly spectrally neutral responses, I try to shy away from it. Some products on the market in recent years have perfected this technology (Mitomo True ND, Formatt Firecrest ND), but even then, I try to avoid any additional coloration of the exposures when possible.
In this case, I couldn’t avoid it. For deeper stop trials, given my limited resources (small testing space, not enough scrims, not small enough possible shutter angle), I had to use the C300 Mark II’s internal ND filters. The only way to test these filters would be through dismantling the filters and profiling their spectral response with a spectroradiometer. Do I have this equipment? No. Do I have friends in high places that have this equipment? Yes. Does this sound like the idea for a future post? Maybe – it depends on which of these friends would have the willingness to dismantle a C300 Mark II and extract the filter.
Color Correction Filtration
I used to believe in the use of these filters for this type of camera test instead of using a camera’s white balance adjustment. I have since decided to change my attitude since I have realized that they need their own profiling to trust their spectral neutrality. I didn’t use any of these types of filters (like the 80/85 series, or the 81/82 series) in this test.
Lens Choice
For these tests, I try to pick a lens that would give me as even an exposure I can get across the field of view. Namely, the name of the game is to reduce lens-induced vignetting or flare.
Most lenses vignette a certain amount due to optical and pixel/focal plane vignetting from practical curvature, flaring, and internal reflection. Unsurprisingly, wide-angle prime lenses generally have stronger vignetting than telephoto prime lenses, and wider apertures in both cases have stronger vignetting than smaller apertures.
For this reason, I try to choose at least a medium to telephoto lens, preferably the longest lens the testing space would allow. Not only would I get lens-induced vignetting, I also lessen the possibility of stray light pollution from the lighting units hitting the lens front element. In this test case, I chose a Canon Cinema Prime T/1.3 50mm lens.
![[Image Source: http://www.lenstip.com/245.8-Lens_review-Canon_EF_24_mm_f_1.4L_II_USM_Vignetting.html]](https://cineprocess.com/wp-content/uploads/2015/10/lensstopvignette.jpg)
[Image Source: http://www.lenstip.com/245.8-Lens_review-Canon_EF_24_mm_f_1.4L_II_USM_Vignetting.html%5D
That said, if I had to change the stop, I chose to stop down instead of open up. In my experience, lenses tend to vary less in their vignette characteristics in the deeper stops than they do in their wider stops.
Camera exposure settings
Getting the ‘correct’ exposures
If you fill a room with 10 cinematographers with their own light meters and asked them to measure the light hitting the scene that I lit, you undoubtedly would have gotten at least 5-10 different answers.
So how can I claim to light a scene in a way that makes people believe I lit it ‘accurately’?
Answer: use the camera as the light meter, and expose the scene to the manufacturer’s specifications!
In this case, since I have guaranteed a completely even illumination of the gray card at the ideal optical center of the lens axis and have confirmed its uniformity with my incident light meter, I use a monitor with a false color function that lights up the manufacturer defined number for 18% gray.
False color shows 18% = 39% IRE for Canon Log 2
In this case, I first set the camera to Canon Log, which Canon has previously defined 18% gray reflectance to live at 32.8% IRE. I then set the false color ‘search’ function to light up at 32.8% IRE and adjust the camera settings, lens stop, and illumination to give me a gray card that illuminates at center at 32.8% IRE. Once this was done, I set the camera back to Canon Log 2. as the recommended new log curve. Through this methodology, I found 18% gray reflectance to live at 39% IRE.
This issue then begs the question: what cocktail of camera settings should I choose to give me this established exposure at this given, manufacture-specified ideal ISO setting? Given that I have to bracket my exposures, I try to start at the center of the range of each settings available to me, in order to reach both ends of my exposure directions, in order of what I change first, with the nominal exposure bolded and variables arranged from darkest to brightest exposure:
- Shutter (@ 23.976 frames per second): 11.25°, 22.5°, 45°, 90°, 180°, 360° (for you absolutists out there: 1/800″, 1/400″, 1/200″, 1/96″, 1/48″, 1/24″)
- Illumination: 200 FC, 400 FC, 800 FC 1600 FC
- Filtration: 1.2 ND, 0.6 ND, 0.0 ND
- Stop: T/22, T/16, T/8.0, T/5.6, T/4.0, T/2.8, T/2.0, T/1.4
When I performed the aforementioned procedure for my starting exposure of ISO 800, 200FC incident, 45° shutter, and no filtration, I had to close aperture 1/6 of a stop from T/5.6 to T/5.6 1/6.
Since I wanted to explore the color and exposure response, I chose the highest possible color bit depth and processing available in camera: 12 bit color depth, with full color sub-sampling (444), at HD resolution. And since I wanted to know everything I could about this camera response, I also ran trials for every single color primary setting (color space):
- Cinema Gamut
- Rec 2020
- DCI-P3
- Rec 709
Here are the settings I could not change in order for this test to make sense:
- ISO: 800
- Color Temp: 3200K
- Bit Depth: 12bit
- Resolution: HD
- Color Sampling: 444
Here are all of the trials laid out:
Test 1: Over/Unders |
|||||||
| Global Settings | Light Start Distance: | 10′ | |||||
| Lens: | Canon Cine 50mm | ||||||
| ISO: | 800 | ||||||
| Color Temp: | 3200K | ||||||
| Bit Depth: | 12bit | ||||||
| Resolution: | HD | ||||||
| Color Sampling: | 444 | ||||||
| Trial | Primaries | Incident FC | Stop | Shutter | Filtration | Scrim/Flag | Light Distance (ft) |
| N | Cinema | 200 | 5.6 1/6 | 45 | Clean | 1x Double | 10 |
| Rec2020 | |||||||
| DCI-P3+ | |||||||
| Rec709 | |||||||
| N-1 | Cinema | 200 | 5.6 1/6 | 22.5 | Clean | 1x Double | 10 |
| Rec2020 | |||||||
| DCI-P3+ | |||||||
| Rec709 | |||||||
| N-2 | Cinema | 200 | 5.6 1/6 | 11.25 | Clean | 1x Double | 10 |
| Rec2020 | |||||||
| DCI-P3+ | |||||||
| Rec709 | |||||||
| N-3 | Cinema | 200 | 8 1/6 | 11.25 | Clean | 1x Double | 10 |
| Rec2020 | |||||||
| DCI-P3+ | |||||||
| Rec709 | |||||||
| N-4 | Cinema | 200 | 11 1/6 | 11.25 | Clean | 1x Double | 10 |
| Rec2020 | |||||||
| DCI-P3+ | |||||||
| Rec709 | |||||||
| N-5 | Cinema | 200 | 8 1/6 | 11.25 | Int. 0.6 | 1x Double | 10 |
| Rec2020 | |||||||
| DCI-P3+ | |||||||
| Rec709 | |||||||
| N-6 | Cinema | 200 | 11 1/6 | 11.25 | Int. 0.6 | 1x Double | 10 |
| Rec2020 | |||||||
| DCI-P3+ | |||||||
| Rec709 | |||||||
| N-7 | Cinema | 200 | 8 1/6 | 11.25 | Int. 1.2 | 1x Double | 10 |
| Rec2020 | |||||||
| DCI-P3+ | |||||||
| Rec709 | |||||||
| N-8 | Cinema | 200 | 11 1/6 | 11.25 | Int. 1.2 | 1x Double | 10 |
| Rec2020 | |||||||
| DCI-P3+ | |||||||
| Rec709 | |||||||
| Black Frame | Cinema | N/A | 22 | 11.25 | LENS CAP | ||
| Rec2020 | |||||||
| DCI-P3+ | |||||||
| Rec709 | |||||||
| N | Cinema | 200 | 5.6 1/6 | 45 | Clean | 1x Double | 10 |
| Rec2020 | |||||||
| DCI-P3+ | |||||||
| Rec709 | |||||||
| N+1 | Cinema | 200 | 5.6 1/6 | 90 | Clean | 1x Double | 10 |
| Rec2020 | |||||||
| DCI-P3+ | |||||||
| Rec709 | |||||||
| N+2 | Cinema | 200 | 5.6 1/6 | 180 | Clean | 1x Double | 10 |
| Rec2020 | |||||||
| DCI-P3+ | |||||||
| Rec709 | |||||||
| N+3 | Cinema | 200 | 5.6 1/6 | 360 | Clean | 1x Double | 10 |
| Rec2020 | |||||||
| DCI-P3+ | |||||||
| Rec709 | |||||||
| N+4 | Cinema | 400 | 5.6 1/6 | 360 | Clean | Clean | 10 |
| Rec2020 | |||||||
| DCI-P3+ | |||||||
| Rec709 | |||||||
| N+5 | Cinema | 800 | 5.6 1/6 | 360 | Clean | Clean | 7 |
| Rec2020 | |||||||
| DCI-P3+ | |||||||
| Rec709 | |||||||
| N+6 | Cinema | 1600 | 5.6 1/6 | 360 | Clean | Clean | 5.00 |
| Rec2020 | |||||||
| DCI-P3+ | |||||||
| Rec709 | |||||||
| N+7 | Cinema | 1600 | 4 1/6 | 360 | Clean | Clean | 5.00 |
| Rec2020 | |||||||
| DCI-P3+ | |||||||
| Rec709 | |||||||
| White Clip | Cinema | N/A | WFO | 360 | Clean | Clean | |
| Rec2020 | |||||||
| DCI-P3+ | |||||||
| Rec709 | |||||||
In my next section, I will show you the data and how to make heads or tails out of it. In the meantime, enjoy some classic Method Man.
